- Published on
Google Summer of Code Blog 2
- Authors

- Name
- Mohammad Aadil Shabier
Introduction
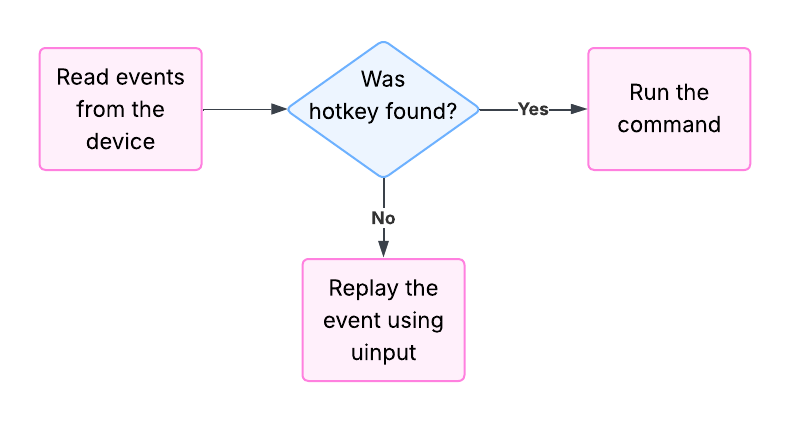
In the previous blog, we listed out some devices, grabbed them for ourselves, and logged the events. In this blog, we aim to do something a bit more useful. While using a hotkey daemon, if the keys we enter do not correspond to a declared hotkey, we would expect the underlying window manager to receive those keypresses. Since we grabbed those devices, this isn't possible. What we do instead is replay those kepresses using uinput1.
What is uinput?
uinput is a kernel module that makes it possible to emulate input devices from userspace. A process can create a virtual input device with specific capabilities. Once this virtual device is created, the process can send events through it, that will be delivered to userspace and in-kernel consumers. This is the same linux module that is used in the
evdevimplementation.
Goals
The purpose of this experiment is to work out how to integrate it better with the evdev implementation, as the current version uses evdev::uinput, a wrapper over uinput that is designed to be easy to work with. Getting this working will give a better idea of changes that need to be done, and things that can stay the same during the integration.
Implementation
uinput basics
let mut uinput_dev = uinput::default().unwrap()
    .name("uinput device").unwrap()
    .event(uinput::event::Keyboard::All).unwrap()
    .create().unwrap();

let event = uinput::event::keyboard::Key::A;
uinput_dev.click().unwrap();
uinput_dev.synchronize().unwrap();
Here we use the newly created uinput device to send a keyboard click(press + release) of the A key on the keyboard. We then synchronize to flush the output immediately. While this is a simple interface to work with otherwise, this can be a little tricky to work with in our case because we have to translate the evdev keycode to the uinput::event::keyboard::Key enums variant. The uinput library provides a way to convert the Key to a keycode, but not the other way round.
Fortunately, digging through the source files leads us to an undocumented method: uinput::Device::write. The library makes use of this function internally, and we can too
/// Send a press event.
pub fn press<T: event::Press>(&mut self, event: &T) -> Res<()> {
    self.write(event.kind(), event.code(), 1)
}

#[doc(hidden)]
pub fn write(&mut self, kind: c_int, code: c_int, value: c_int) -> Res<()> {
    // ...
}
Replaying keyboard events
Click to enlarge snippet
let device_name = keyboard_event.device().name().to_string();
let key_code = keyboard_event.key() as i32;
let state = keyboard_event.key_state() as i32;
device.write(EV_KEY, key_code, 1 - state)?;
device.synchronize()?;
}
Using the write method makes it trivial to replay keyboard events. The one thing we have to do is invert the keyboard state, as uinput and libinput define the pressed and released state differently.
Mouse Click Events
To be thorough, we also have to emit mouse events. Since mouse button events are also keypresses, and are defined the same as keyboard key presses, we can do the same thing for mouse click events.
Click to enlarge snippet
let button = button_event.button() as i32;
let state = button_event.button_state() as i32;
device.write(EV_KEY, button, 1 - state)?;
device.synchronize()?;
The first time I wrote this code, I could not get mouse events to work. Then I realized that I hadn't enabled mouse events for the uinput device. So I enabled all events because I did not want to enable every event I might use manually.
let builder = builder.event(uinput::Event::All)?;
This did not seem to work, and I had to end up adding all mouse button events manually, which is what people seem to do. (helful gist here)
for event in event::controller::Mouse::iter_variants() {
    builder = builder.event(event)?;
}
Mouse Movement Events
Mouse movements are relative movements, which have a dx, and a dy component, which signify change of position in pixels, in the X and Y coordinates. We first enable the uinput device to emit relative position events.
Click to enlarge snippet
let dx = motion_event.dx_unaccelerated();
let dy = motion_event.dy_unaccelerated();
device.send(Relative::Position(Position::X), dx as i32)?;
device.send(Relative::Position(Position::Y), dy as i32)?;
device.synchronize()?;
I made an executive decision and disabled mouse acceleration here, because no one needs that. :)
There doesn't seem to be a standard way to declare mouse acceleration2. The best way seems to be to change settings in multiple places. Anyone using swhkd-libinput, and wanting to use mouse acceleration will now have one more configuration to change.
Mouse Wheel Events
Mouse wheel events follow the same pattern, we enable the event for the uinput device, and we then emit the event. There are two things we have to keep in mind:
libinputprovides mouse wheel movements in multiples of 120, whileuinputexpects multiples of 1.- The directions are flipped(naturally).
Click to enlarge snippet
let vert = scrollwheel_event.scroll_value_v120(Axis::Vertical);
let hori = scrollwheel_event.scroll_value_v120(Axis::Horizontal);
log::info!(
    "Mouse: {}, wheel vert: {vert}, hori: {hori}",
    scrollwheel_event.device().name(),
);
let (event, value) = if vert != 0.0 {
    (Relative::Wheel(Wheel::Vertical), -vert / 120.0)
} else {
    (Relative::Wheel(Wheel::Horizontal), -hori / 120.0)
};
device.send(event, value as i32)?;
device.synchronize()?;
Refactoring
At this point, we were doing everything in a single file, and it seemed like a great point to finally start a little bit of modularizing. We go for a functionality based modularization approach, and make the files, uinput_layer.rs, and device.rs; we then move everything.
Results
Feel free to check out the Github repository: swhkd:libinput-uinput.
Footnotes
uinput: https://kernel.org/doc/html/v4.12/input/uinput.html ↩
Arch Wiki Mouse Acceleration: https://wiki.archlinux.org/title/Mouse_acceleration#Configuration_example ↩